As the value of your digital assets grows, you naturally start looking for better ways to keep them safe. Exchanges get hacked. Companies go bankrupt. Accounts get frozen. These risks push investors toward more secure solutions. That’s exactly where the concept of a cold wallet comes in. So how do you actually set up a cold wallet? Is it really as secure as people claim? Which method should you choose? In this guide, I’ll answer all those questions from the ground up with practical, actionable steps.
What Is a Cold Wallet and Why Does It Matter So Much?
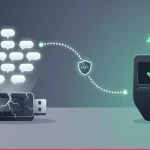
A cold wallet is a storage method where your private keys are kept completely offline. Since it has no direct internet connection, hackers cannot remotely access it — technically impossible. Hot wallets (mobile or desktop apps) stay online and carry more risk. If you’re investing for the long term with a “buy, hold, and forget” strategy, a cold wallet is made for you.
Three Major Benefits of Using a Cold Wallet
- Physical and digital isolation: Your private keys never touch the internet. This completely eliminates threats like keyloggers, trojans, or phishing attacks.
- Full user control: No daily limits, no frozen accounts, no third-party approvals. The wallet is entirely yours.
- Zero trust required: You don’t have to trust any exchange, broker, or third-party service. You become your own bank.
How to Set Up a Cold Wallet – Two Different Methods
There are two main ways to set up a cold wallet. Which one you choose depends on your technical comfort level, your budget, and how much crypto you’re storing. Let’s go through both methods step by step.
Method 1: Hardware Wallet Setup (Most Popular)
Hardware wallets — from brands like Ledger, Trezor, and Keystone — are special encryption devices that connect to your computer via USB or Bluetooth. Transactions get approved directly on the device, and your private keys never leave it. This method balances security and ease of use.
- Buy a trusted hardware wallet: Only purchase from the official manufacturer’s website or authorized distributors. Avoid second-hand devices — they could be tampered with. The Ledger Nano X, Trezor Model T, or the budget-friendly Ledger Nano S are all solid choices.
- Unbox and connect the device: Plug it into your computer or phone. During first-time setup, you’ll be asked to create a PIN code. This PIN makes it much harder for someone who physically steals your device to access your funds. Choose a hard-to-guess PIN with at least 6 digits.
- Generate and save your recovery phrase (seed phrase): The device will show you a random list of 12 or 24 words. These words are the master key to all your assets. Never store these words digitally — no photos, no cloud uploads, no notepad files. Write them down by hand on paper or — even safer — engrave them onto a stainless steel plate. Store that paper or plate in a secure location protected from fire, theft, and flooding.
- Install the official wallet software on your computer: Download the brand’s official software (Ledger Live for Ledger, Trezor Suite for Trezor). This software lets you manage your device, install blockchain apps, and check your balances. Never enter your seed phrase into this software — legitimate software will never ask for it.
- Install blockchain apps on your device: To manage Bitcoin, Ethereum, or other cryptocurrencies, you need to install the corresponding “apps” on your hardware wallet. For example, install the Bitcoin app before receiving Bitcoin. These apps allow the device to communicate with the blockchain.
- Get your receiving address and make a test transfer: Click “Receive” in the software. Your device will display a receiving address on its screen. Copy that address and send a small amount from your exchange (Binance, Bybit, Coinbase, etc.). Once the transaction confirms and the balance shows up, transfer the rest of your assets to your cold wallet.
Method 2: Paper Wallet Setup (Zero Cost)
A paper wallet is simply a printed or handwritten copy of your public and private keys. If generated on a completely offline computer, it’s theoretically as secure as a hardware wallet. But it’s much more cumbersome to use.
- Prepare a clean, offline computer: Disconnect the internet cable. Turn off Wi-Fi. If possible, use a brand-new computer or reformat an old laptop that has never been online.
- Use an open-source key generator site: Save a site like bitaddress.org offline. Do this while connected to the internet (save the .html file), then disconnect and open the file offline.
- Generate randomness and create keys: Move your mouse randomly on the page to generate entropy (randomness). Click “Generate.” The page will show a public address and a private key.
- Print or hand-write the keys: Print the information, but make sure your printer has no memory storage. Safer yet — write the private key by hand with a pencil or pen. Store that paper in a secure place. Also ensure the printer isn’t connected to the network.
- Send assets to your new address: Use the public address you generated as the recipient address from your exchange or another wallet. Never share your private key with anyone.
5 Critical Mistakes to Avoid When Setting Up a Cold Wallet
Setting up a cold wallet is relatively straightforward, but small mistakes can put all your assets at risk. Here are the most common errors and how to avoid them:
- Storing your seed phrase digitally: Saving it on Google Drive, Evernote, WhatsApp, or as a photo is extremely risky. Malware can access those files and steal your words. Solution: Physical copies only.
- Using public Wi-Fi or an infected computer: When setting up your cold wallet, the computer you use must be clean and secure. Solution: For paper wallets, use an offline, clean computer.
- Not testing your recovery phrase: You backed up your seed words — but are they correct? To test, send a small amount, wipe the wallet, and restore it using your seed phrase. Solution: Always run a recovery test.
- Buying a fake or tampered hardware wallet: Devices sold on second-hand markets or unauthorized sellers may have been compromised. Solution: Only buy from the official manufacturer’s website or authorized resellers.
- Relying on a single backup: Fire, flood, earthquake, or theft could destroy your only copy. Solution: Keep at least 2 copies in different physical locations (home safe + bank deposit box, for example).
What to Remember When Transacting with a Cold Wallet
After successfully setting up your cold wallet, follow these rules when making transactions:
- Always verify the receiving address on your device’s small screen. Software on your computer could try to change it.
- Keep your hardware wallet’s firmware updated. New updates close security vulnerabilities.
- After sending assets to your cold wallet, you can monitor your balance using a block explorer without plugging the device back in.
- If you trade frequently, keep a small amount in a hot wallet for convenience and store the bulk of your assets in a cold wallet. Don’t mix the two.
Final thought: If you have more than $500 worth of crypto sitting on an exchange or a hot wallet, don’t wait — move it to a cold wallet. It takes about 15 minutes and gives you years of peace of mind. Remember: “Not your keys, not your coins.” Be your own bank, treat security as a tool, and never neglect it. Order a Ledger or Trezor today, or generate your own paper wallet on an offline computer. While investing in the future, don’t forget to protect it at the same time.
Frequently Asked Questions
Yes and no. A cold wallet is theoretically 100% secure against remote cyber attacks because it has no attack surface. But if you lose your seed phrase or share it with someone, your assets can be stolen. Security is about 50% hardware and 50% user behavior.
Nothing happens to your funds. You can restore all your assets on a new hardware wallet (or even a compatible software wallet) using your backed-up seed phrase. A broken device doesn’t mean lost crypto.
Paper wallets are still secure but not as convenient as hardware wallets. For a ‘buy and forget for years’ strategy, they offer a free solution. However, every time you want to spend or move funds, you’ll need to manually type your private key — which is tedious. In 2025, hardware wallets are much more practical.
Absolutely. Some investors use two or three different hardware wallets to spread risk. Some even use different brands (one Ledger, one Trezor) to hedge against a potential vulnerability in a single brand.
Hardware wallets are extremely user-friendly. An average computer user can complete the setup in 15–20 minutes by following the steps in this guide. Paper wallets require a bit more manual effort, but they’re also not difficult.